Wednesday, April 27, 2011

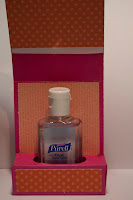
Birthday Present Card

Here's a super cute birthday card that could also be used to hold a gift card! We made this card at Stamp Camp! I had so much fun there I signed up to be a demonstrator a week later!


Stamp Set

·     117710 – Upsy Daisy (Birthday Celebrations)  Pg. No. 112
·         111532 – Party Hearty (present) Pg. No. 54
Paper/Ink
·         117163 – Elegant Soiree DSP (4" x 3 ¾ ") Pg. No. 175
·         117157 – Patterns DSP Subtles (Marina Mist) (4" x 1 ½ ") Pg. No. 175
·         102953 – Crumb Cake Card Stock Pg. No. 169
o   8 ½ " x 4"
o   4 ¼ " x 3"
o   2 ¾ " x 1 1/8" 
·         101650 – Very Vanilla Card Stock (4" x 3 ") Pg. No. 169
·         119682 – Marina Mist Card Stock (4 ¼ " x 3 ¼ ") Pg. No. 167
·         119688 – Marina Mist Stampin' Pad Pg. No. 167
Punches
·         119876 – Large Tag (#38) Pg. No. 202
·         119868 – 1" Circle Medium (#47) Pg. No. 202
Other
·         119762 – 5/8" Marina Mist Grosgrain Ribbon  Pg. No. 191
o   5" piece
o   2" piece
o   14" piece
·         104294 – Sticky Strip  Pg. No. 197
·         104430 – Stampin Dimensionals Pg. No. 197                    

Card Instructions

Bottom of the present:
  1. Fold the crumb cake card stock (81/2" x 4") in half
  2. Adhere Elegant Soiree Designer Series Paper (DSP) (4" x 3 ¾ ") to the top half of the crumb cake cardstock. DO NOT attach the lower half of the DSP.
  3. Punch a half circle in the center of the top of the Crumb Cake piece with the 1" circle punch.
  4. Place the longer Marina Mist ribbon (5") in the middle of the circle and secure the end to the inside of the Crumb Cake piece.
  5. Secure the lower end of the ribbon to the back of the DSP. Adhere the lower half of the DSP to the Crumb Cake cardstock.
  6. Place 1" of sticky strip at the top edges of the two longer sides of the Crumb Cake cardstock and close the “bottom” of the present.
Tag
7.       Stamp saying on Crumb Cake (2 ¾ x 1-1/8) in Marina Mist
8.       For a longer tag, thread the stamped piece through the back of the tag punch and punch!

Present Topper
9.       Fold the Crumb Cake card stock (4" x 3") in half
10.   Adhere the Vanilla card stock (4" x 3") to the Marina Mist card stock (4 ¼ "x 3 ¼ "). Place two dimensionals near the top corners of the Marina Mist cardstock (backside). Center the card to the inside fold of the Crumb Cake Topper.
11.   Place two dimensionals on the top corners of the Vanilla card stock and close the “lid”. It will stay open slightly and slides over the bottom of the present.
12.   Adhere Birthday tag to the right edge of the Crumb Cake cardstock or adhere to the back of the right side of the designer paper.
13.   Wrap the smaller piece of Marina Mist ribbon around the middle of the Marion Mist or Elegant Soiree DSP and adhere to the front of the folded Crumb Cake piece lining up with the ribbon on the bottom half of the card.
14.   Adhere a Marina Mist bow to the center of the ribbon using sticky strip of glue dots.
15.   Slide the card into the present.

Saturday, April 23, 2011

Get well my little one

My daughter, Makayla, is off to college in a few short months. We have been talking about what going off to college is going to be like. She is asking questions like, should I join a sorority or tryout for cheer? She knew she couldn't do both and while she really wanted the sorority life, cheer was more important. It was a big commitment, practice 5 days a week for about 3 hours a night. Plus homework, oh and they do travel with the team. Mind you she stopped cheering because she fractured her left knee cap! She recovered completely but I made her find a new sport. While she discovered her true passion in Volleyball she didn't have the required height that it took to play in a Division 1 school. Her backup was cheer.
She started training and was intent on making the team. So off we set for a weekend to WSU for her to participate in a cheer clinic put on by the current squad. The camp was great until the last 15 minutes. She attempted a back tuck, which she hadn't practice in about 3 years, and landed funny. As soon as she landed I knew there was something wrong and all the memories of injury after injury came to mind. Needless to say it was a long and very uncomfortable ride home for her. The doctors confirmed that she tore her ACL and she is scheduled for surgery on Monday.
While she is terribly disappointed that she can't cheer, I think she is more disappointed that she can't play intermural volleyball and dance at her senior prom. I am a firm believer that we are not given more then we can handle and something is telling her it is time to slow down, take time for herself, and learn to love something new that isn't related to sports.

With her surgery due up, I put together a little gift for her when she wakes up.

Card & Gift Bag: Stampin Up!
  • Designer Series Paper "Beyond the Garden"
  • Brights Collection Green cardstock
  • Embossing Powder: Wild Wasabi, Tangerine Tango, & Melon Mambo
  • Rhinstones
  • Daffodil Delight Ribbon
  • Greenhouse Garden Stamp Set
She loves bling so I found this great 2011 frame at Michaels and added one of her senior photos to it! All the other goodies are also from Michaels.

Thursday, April 21, 2011

Thank You bags

As I was sorting through my latest workshop order I was struggling with my inner creative self. Here was this plain brown box that held all the fun & exciting things my customers are looking forward too. I just couldn't give them the plain box, I don't have any Stampin Up! logo bags and I wanted to add a personal touch to the orders I get to deliver. So here is what I came up with!

  1. I rolled the Very Vintage stamp all over the bag.
  2. Cut the papers out with scallop scissors
  3. Stamped the "So Many Thanks" with Tempting Turquoise.
  4. Used my blender pen to erase the word "THANKS"
  5. Colored "THANKS" with Basic Black Stampin Write Marker
  6. Attached business card
  7. Punched oval wrote customer name & tied with a ribbon!

Stamp: Very Vintage & So Many Thanks 
Ink: Basic Black & Tempting Turquoise
Paper: Basic Black & Tempting Turquoise
Punch: 1 3/4 Oval
Accessories: Blender Pen, Snail, Dimensionals, Whisper White 1/4 grosgrain ribbon, & a white gift bag


Sunday, April 17, 2011

Bellevue 10K!

I completed my first 1/2 marathon in March. I did virtually no training for it and honestly was just happy I finished oh and that I wasn't last place :-) In fact I was far from last place and was proud of my time. Knowing that the Seattle Rock-n-Roll 1/2 marathon is really just around the corner I decided to get my bottom in gear and start training.
The Bellevue 10K was Sunday April 17th and my sweet puppy Jett and I headed to downtown Bellevue to get our race. I finished with a pretty decent time (which I better beat with Bloomsday) and really enjoyed the run route. My only complaint regarding the race was the 10K & 5K course merged together on the last mile and it was narrow! Thankfully I have already received an email update from the race officials that they will be changing that next year!
And since they don't have photos up yet, I will share the start and finish photos from the Mercer Island 1/2!


Photos are now available for the Bellevue 10K but it looks like they only have two photos of my sweet puppy and I. First one is the start of the race and the second one is the finish. It is funny to note that the start and finish signs look as though I have it wrong but the race started and finished in the same spot :)


Saturday, April 16, 2011

What do Cheerleaders, Cards, and Girls Night Out have in common?

I was asked to host a booth for a fundraiser to help send one of our local all-star cheerleading squads to Nationals in Florida. What a fun night it was, there was food, wine, purses (yes, of course I got myself a new purse), candles, household goods, and Stampin Up! I had so much fun reminiscing the past. I got to reacquaint myself with the cheer moms I have missed since my daughter, Makayla, switched from Cheer to Volleyball.

I learned a few valuable lessons as well for all you demonstrators out there! Parents of tween and early teenage girls are always looking for birthday party ideas. Well Stampin Up! has a great solution for them :-) I was able to book two birthday parties from the fundraiser. That wasn't even in my sales pitch until one mom started discussing how her daughter loved to craft and she was at a loss for her birthday party ideas. Well of course I knew I could help!! Business IS everywhere you just have to ask.

Here are a few of the items that were on display!


Welcome & My first Workshop!

After crafting my entire life I have finally taken the plunge into Stampin Up! I love making homemade gifts and cards and adding Stampin Up! to my life seems right. With that here are a few projects to get us started!

My first workshop!
Birthday Card #1

Supply List

Papers
  • Basic Black
  • Chocolate Chip
  • Pretty in Pink
  • Whisper White
Accessories
  • Ink: Rich Razzelberry
  • Stamp: Sincere Salutations
  • Ribbon:  5/8" Grosgrain  Pretty in Pink
  • Punch: Scallop Ribbon edge
  • Basic Pearl
  • Sizzix Die: Perfect Polka Dots Embossing folder
  • Snail adhesive
Pick up all of these supplies here! http://melissa_chapman.stampinup.net

Card # 2 Thinking of you

Supply List

Papers
  • Rich Razzelberry
  • Whisper White
Accessories
  • Ink: Rich Razzelberry
  • Stamp: Sincere Salutations
  • Ribbon: 1/4" Grosgrain Whisper White
  • Sizzix Die: Manhattan Flower Embossing folder
  • Snail adhesive
 Pick up all of these supplies here! http://melissa_chapman.stampinup.net