Monday, October 31, 2011

Happy Halloween!

Today is the last day of October! Oh my before we know it there will be snow on the ground and the holiday festivities will be in full swing! I was fortunate enough to spend Halloween with my favorite niece and one of the three of my favorite nephews! We went Trick-or-Treating around the Microsoft campus on Friday and they were able to come and dress up and get candy!

I love it! I was so bummed because I rushed out of the house without my camera and all I had was my phone! So the photos are not great (bad in fact) but I want to remember the day!

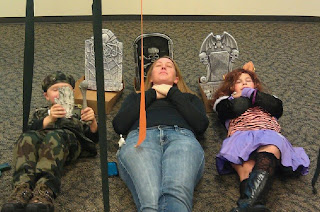
Here are the two of them

We decided to pretend it was our graves. My nephew thought he needed to cover his face :)

Here is Abby under the professionals setup. His camera broke so we had to improvise! She was the wolve from Monster High!

Aiden under the professional setup. I love my little army man! 

Aiden after decorating his bat with his black icing, oh and he ate it too!

I am wishing you all a safe, happy, and creative holiday season!


Thursday, October 27, 2011

Where's the witch??

I can't believe we are just a few days away from the end of October! Holy Moly where did the year go? So much happened this year that I guess time just fly's by when you having fun right?

I am really trying to stick to Halloween projects for the rest of the month but I will tell you there are so many cute Thanksgiving and Christmas crafts calling my name! Anyhow, a few days ago Stampin Up asked their Artisan award winners to post a Halloween project on their Facebook fan page and Heather Summers (yes, I stalk her blog) posted this cute Rosette project and I couldn't resist recreating it.

How cute is this?


Supplies Used
Stamp Set
Page
122652
Delightful Dozen
40
Paper/Ink
115316
Rich Razzleberry Card Stock
177
121045
Basic Black Card Stock
180
101179
Basic Black Stampin’ Pad
180
Punches
119858
Boho Blossom
210
119854
1¾” Scallop Circle
210
Other
119246
Basic Rhinestones
198
122941
Silver Brad
199
124134
Cellophane Bags (Holiday mini)
11

Shimmer Mist Paint

113463
Top Note Die
222
117335
Perfect Polka Dots Embossing Folder
219
113439
Big Shot
215
104294
Sticky Strip
206

Glue Gun

  1. Using Rich Razzleberry cut two strips 1” x 11”
  2. Using Basic Black cut two strips 1½”  x 11”
  3. Score every ¼”  and fold "mountain to peak"
  4. Attach a piece of Sticky strip to both ends of one Basic Black and one Rich Razzleberry strip. Attach each color together, forming a circle.
  5. Squeeze the circle together as small as you can and use a hot glue gun to hold in place. I let it dry on one side and flip it over and glue the other side. It may be over kill but I have never had one come apart.
  6. Spray both Rosettes with Shimmer Mist paint. Let me know if you need directions for making this, it is super easy!
  7. Attach the Rich Razzleberry rosette to the Basic Black.
  8. Using Basic Black punch 1 3/4 Scallop Circle out. Spray with Shimmer Paint.
  9. Emboss it using the Perfect Polka Dots Embossing folder. Spray with Shimmer Mist paint.
  10. Using the Small & Medium Basic Rhinestones apply them alternating between each of the scallops.
  11. Using Rich Razzleberry punch out the small flower from the Boho Blossom punch. Using Basic Black punch out the medium flower. Spray with Shimmer mist and wad them up. Let it dry (it is really quick) and unfold. This gives your flower some texture!
  12. Stamp Happy Halloween on a ¾” x 2 ½” piece of Rich Razzleberry. Cut the ends.
  13. Using a black Sharpie color the Silver Brad. Then attach the brad through the middle of the flower and Happy Halloween strip. Attach to the scallop circle.
  14. Glue the scallop to the top of the Rich Razzleberry rosette.
  15. Create your witches boots. You can free hand them or buy a pre-made die cut. I embossed the black of the boot with the Perfect Polka Dots Embossing folder. I attached Basic Rhinestones for the laces.
  16. Attach the witch’s boots to the bottom of the Cellophane Bags. I used sticky strip to attach the bags. I didn’t want my boots to fall off! I worked hard on them J Fill the bags with candy and close.
  17. Attach sticky strip to the top of the Cellophane Bags.
  18. Cut out the Top Note using Basic Black. Emboss it using the Perfect Polka Dots folder. Fold it in half to form a card.
  19. Attach the Cellophane Bags filled with candy to the front of the Top Note Die.
  20. Attach the Rosette on top of the bags
  21. Enjoy your Eye Candy ;)
As always I would love to help you create this super fun project, we can switch out the witch for Turkeys or Santa’s Elves! Oh the possibilities!


Wednesday, October 26, 2011

Pumpkins & More

Hello, My name is Melissa and I still carve pumpkins even though my children are grown! I can't be the only one right?  :) I love Halloween, it happens to also be my daughters favorite holiday so having her away at college this year is tough. She was home for a visit this weekend so we were able to get some crafting time in.

She made a rossette wreath just like the one HERE and boy is she proud of it. I will post photos as soon as she hangs it up :) My daughter is a Freshman at Washington State University so this is my tribute to her.


I know it isn't the greatest photo but my tripod is broke and this was hand held. I found this great site with 100's of pumpkin stencils for just $5.95. Check them out HERE if you love pumpkin carving I definitely recommend this site.

Here are two photos of my porch during the day. I wasn't really feeling Halloween this year (I know I will get used to my sweet girl being gone) so I went straight for Thanksgiving since that is the next time my sweet girl will be home from school.


Hope your holiday is a happy and warm one :) I am happy to report that I will be back running! I am doing a 5K on Halloween eve to test out my knee! It will be so fun to watch all the goblins and ghouls running along side me! Wish me well.

Tuesday, October 25, 2011

Witches give good candy right???

Well it isn't really a witch but her boot! Yes I am on a quest this week to come up with the most creative ways I can to give away candy. I know most little kids don't care they just want the candy, but it is the few that oooh and ahhh at the package that keep me on the quest year after year. I have been inspired by so many Stampin Up! deom's and this one I just loved by www.Stampinwithtami.com I actually made two of these, one for my daughter and one for here sweet roommate. I am thankful every day that they get along because it made the college transition so much easier! I will actually be replacing the candy and putting in some travel lotion and hand sanitizer bottles fromm Bath and Body works.

How cute is the boot! It is actually a Christmas stocking that I have turned into a boot!


Supplies

Paper                                                                                     Page
122352
Timeless Portrait DSP
185
115316
Rich Razzleberry C.S.
177
121078
12x12 Textured Basic Black C.S.
180

Other                                                                                     Page
124098
Stocking Die Cut (mini)
24
121811
3 ½ Circle Die Cut
220
120175
Vintage Wallpaper Embossing Folder
219
113439
Big Shot
215
119850
1 ¾ Circle Punch
212
119857
Word Window Punch
209
119246
Basic Rhinestones
198
109027
Basic Black ¼ grosgrain Ribbon
195
120930
Rich Razzleberry ¼ Grosgrain Ribbon
195
116854
Frost White Shimmer Paint
203
122334
Simply Scored (mini)
7
104332
Snail
206
104294
Sticky Strip
206

1.       Cut out two Holiday Stocking’s using Rich Razzleberry Card Stock (CS)
2.       Cut out two 3 ½” Circles using Rich Razzleberry Card Stock  
3.       Cut two Cuff’s in Rich Razzleberry from the Holiday Stocking Die
4.       Cut two Cuff’s from the White and Black Timeless Portrait Designer Series Paper (DSP) from the Holiday Stocking Die
5.       Using the 1 ¾” punch out ½ of the punch. This will make the pointy toe.  I suggest making an extra circle and use it as the template. You want both of these circles to be identical.
6.       Glue the circle onto the stocking. Line the “neck” of the circle with the “neck” of the stocking.

7.       Run the stocking through the Big Shot using the Very Vintage Wallpaper Embossing folder. Don’t worry about the top not getting covered because your cuff will hide what isn’t embossed. I am showing you both in case you are concerned about coverage.

8.       Attach Cuff’s to the boots. Remember that these boots need to be identical so use the first one as a guide for the second boot.

9.       Spray both boots with Frost Shimmer paint (if you don’t know how to do this email me and I can give you a quick run down. You will need rubbing alcohol, a small spray bottle, and a few drops of Shimmer paint. Shake well. ) make sure you cover the entire boot. Let it dry.
10.   Build your box. Cut two pieces of Rich Razzleberry at 3 ¼” x 5 ½”. Score on three sides at 1 3/8”. See this post, Frankenstein, to build the rest of the box.  Attach Sticky Strip to the box. (sorry about the blurriness of the last photo)


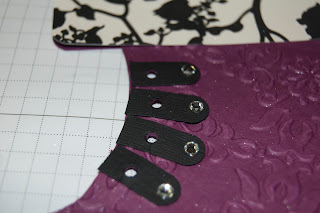
11.    Punch out 4 Word Windows from Basic Black. Cut them in half. Using Sticky Strip attach them as the “laces” of the boot.
12.   Attach Basic Rhinestones to each lace.

13.   Punch a small hole in each lace for ribbon.

14.  Cut the "heel" of the boot. I eyeballed this, from about where the circle meets the stocking I cut diagnally and then from the heel straight up about 3/4 of and inch. Look at the photos to gauge that. Then attach the box to boot. Make sure your boot can stand up so you will need to play with it a bit. You may need to fill it with treats to get it to stand correctly.

15.   Cut both pieces of ribbon at 32” Lace up the boot and tie a bow!
I know this isn’t an easy project, if you get stuck in any area please contact me because I want everyone to be able to create this boot! I would love to teach you and your friends how to create it! Email or call me today to schedule your private lesson.
I am adding this project to my first ever blog hop! What is a blog hop you ask? Here are Shirley Pumpkin's words regarding the hop:

A blog hop is a linky list that is SHARED ON MULTIPLE BLOGS.
When several blogs put the same linky list code on their blog, the
exact same list appears on each blog.

Blog visitors can submit their entries on any blog that contains the list.
The entries will appear on each blog where the list resides.

Blog readers see the same list on each blog, and can "HOP" from blog
to blog seeing the same list of links to follow: BLOG HOP!